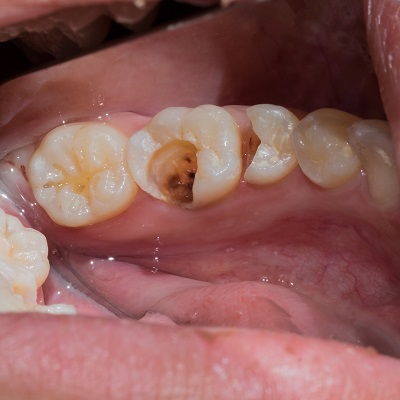
Tooth fillings are a common dental procedure used to repair cavities and restore the health and function of a damaged tooth. Understanding what to expect during the process can help alleviate any concerns and prepare you for a smooth experience. This guide walks you through each step of the Tooth Filling procedure, from initial examination to aftercare.
Step 1: Initial Examination and Diagnosis
Consultation and Examination
- Visual Inspection: Your dentist will first conduct a visual examination of your teeth, looking for signs of decay, cracks, or other damage that may require a filling.
- X-rays: If the decay isn't immediately visible, your dentist may take X-rays to get a clearer view of the tooth’s structure and determine the extent of the damage.
Diagnosis
- Cavity Detection: If a cavity is detected, your dentist will recommend a filling. The type and size of the filling will depend on the extent of the decay, the location of the tooth, and your personal preferences.
- Material Selection: Your dentist will discuss the different filling material options with you, considering factors such as durability, aesthetics, and cost.
Step 2: Preparing for the Procedure
Anesthesia
- Local Anesthesia: To ensure comfort during the procedure, your dentist will administer a local anesthetic to numb the area around the affected tooth. This prevents you from feeling pain during the drilling and filling process.
- Waiting Period: It usually takes a few minutes for the anesthesia to take effect. Your dentist will check to ensure the area is fully numb before beginning the procedure.
Isolation of the Tooth
- Rubber Dam Placement: To keep the tooth dry and free from saliva, your dentist may place a rubber dam around the tooth. This also helps to prevent any debris from entering your mouth during the procedure.
Step 3: Removing the Decay
Accessing the Cavity
- Drilling: Your dentist will use a dental drill or laser to remove the decayed portion of the tooth. The size and location of the cavity will determine the type of tool used.
- Cleaning the Cavity: Once the decay is removed, the dentist will clean the cavity to ensure all debris and bacteria are eliminated, creating a clean surface for the filling.
Shaping the Cavity
- Cavity Shaping: The dentist will shape the cavity to prepare it for the filling material. This involves smoothing the edges and ensuring the cavity is properly sized and shaped to hold the filling securely.
Step 4: Placing the Filling
Applying the Filling Material
- Layering (for Composite Fillings): If you're getting a composite resin filling, the material is applied in layers. Each layer is hardened with a special curing light before the next layer is added.
- Single Application (for Amalgam, Gold, or Ceramic): For materials like amalgam, gold, or ceramic, the filling is placed in one go. Your dentist will press the material into the cavity and shape it to fit the contours of your tooth.
Shaping and Polishing
- Initial Shaping: After the filling material is in place, your dentist will shape it to match the natural contours of your tooth. This step ensures the filling fits well with your bite and looks natural.
- Polishing: Finally, the filling is polished to smooth out any rough edges and give it a shiny, tooth-like appearance. This step also helps to prevent plaque buildup around the filling.
Step 5: Final Adjustments
Bite Check
- Bite Test: Your dentist will ask you to bite down on a piece of carbon paper or another material to check how the filling fits with your natural bite. If any areas feel too high or uneven, your dentist will make further adjustments.
- Final Shaping: Any high spots or discomforts will be smoothed out to ensure the filling is comfortable and doesn't interfere with your normal bite.
Post-Procedure Instructions
- Numbness: The effects of the anesthesia will wear off after a few hours. During this time, it's important to avoid chewing on the side of your mouth with the new filling to prevent accidentally biting your cheek or tongue.
- Sensitivity: It’s normal to experience some sensitivity to hot, cold, or pressure after getting a filling, especially with composite materials. This should subside within a few days.
Step 6: Aftercare and Follow-Up
Immediate Aftercare
- Avoid Hard Foods: For the first 24 hours after getting your filling, avoid hard, sticky, or chewy foods that could dislodge or damage the filling.
- Oral Hygiene: Continue brushing and flossing as usual, being gentle around the filled tooth for the first few days.
Long-Term Care
- Routine Dental Visits: Regular dental check-ups are essential to monitor the condition of your fillings and ensure they remain intact and functional.
- Maintenance: Over time, fillings can wear down and may need to be repaired or replaced. Your dentist will keep an eye on the filling during your routine visits and recommend any necessary maintenance.
When to Contact Your Dentist
- Persistent Pain or Sensitivity: If you experience persistent pain, sensitivity, or discomfort that doesn’t improve within a few days, contact your dentist. These could be signs of an issue with the filling or an underlying problem that needs attention.
- Filling Damage: If you notice that your filling feels loose or if part of it has chipped away, schedule a visit with your dentist as soon as possible to avoid further damage to the tooth.


Comments