


There are majorly three methods to complete the Wavlink WiFi extender setup. But the most used one is WiFi.wavlink.com web interface method.
There are more other methods than WiFi.wavlink.com login interface like WPS or Wavlink. Let’s discuss all setup methods one by one.
Wavlink Extender Setup
Through the WiFi.wavlink.com
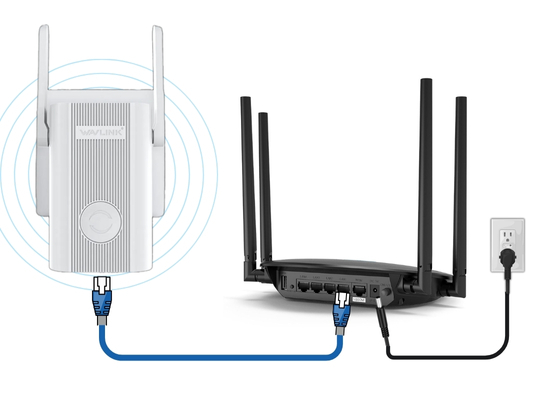
First off, forget typing wifi.wavlink.com into Chrome on your phone while still connected to your main WiFi. That’s where I messed up at first. You have to connect directly to the extender’s temporary network (it’ll look something like Wavlink-N or Wavlink-AC). No password, just hop on. If you try it while on your home WiFi, the page won’t load.
Once you’re on that network, open a browser and punch in either:
⦁ http://wifi.wavlink.com
⦁ or 192.168.10.1 (this one always works if the first doesn’t).
you’ll land on the setup page. Default login is usually admin / admin. Don’t overthink it.
From there, the extender will scan for your existing WiFi networks. Pick your main router’s SSID, throw in your WiFi password, and let it sync. After it reboots, you’ll see a new WiFi network that’s basically your old one with “_ext” or “_plus” slapped at the end. That’s your extended signal.
Through the Wavlink App
⦁ Grab your phone and download the Wavlink app. It’s just called “Wavlink” on iOS/Android. Open it up. Make an account if it nags you. Annoying step, but whatever.
⦁ Now, on the extender, there should be a little reset pinhole. If it’s not brand new, hold that down for like 10 seconds until the lights blink. Start fresh — trust me, it avoids headaches.
⦁ Back on the app, hit the “+” to add a device. It’ll ask what you’re adding — pick “Extender/Repeater.” The app will try to find it, but sometimes it doesn’t. If that happens, just go into your WiFi settings on your phone and manually connect to the Wavlink_xxx network that shows up. No password usually. Once you’re on that, flip back to the app.
⦁ From there, it should scan your existing WiFi networks. Pick your main WiFi, type in your WiFi password, and let it do its thing. This step can hang for a bit, so don’t panic if it spins. If it fails, try again — sometimes the app just bugs out.
⦁ Once it says “success,” the extender will reboot. Give it a couple minutes. The lights should settle, and you’ll see a new WiFi network with “_EXT” or something similar at the end. Connect to that, same password as your main WiFi. Done.
Through the WPS
⦁ Stick it in an outlet somewhere kinda halfway between your router and the dead zone. If you put it in the dead zone itself, congrats, you just made a useless nightlight.
⦁ Find the WPS button on your router. Could be a tiny button with no label, could say WPS, could just be a little weird icon that looks like two arrows chasing each other. Hold that button down for a couple seconds until the light starts blinking.
⦁ The extender has a WPS button (usually on the side or front). Press it. The little light should start blinking too. If you’re like me, you’ll press it once, nothing happens, press it again harder like that makes a difference. Eventually the two should sync up.
⦁ Router and extender do their secret handshake in the background. Give it like 30–60 seconds. Light should go solid if it actually connected. If it keeps blinking forever, nope, try again.
⦁ Once it’s synced, you’ll usually see a new network pop up. Sometimes it copies your existing WiFi name and just adds _EXT or something dumb. Sometimes it straight up mirrors the exact same SSID and you have to guess which one’s which. Either way, connect and test.
Troubleshooting Tips: Wavlink Extender Setup
Login Page Won’t Load
Type 192.168.10.1 in your browser. That’s the magic number. Not Google, not the search bar—the actual URL bar. If it just spins or gives you nothing, disconnect from your home WiFi and only connect to the extender’s network.
Wrong Password or Won’t Connect to Main Router
During setup, you’ll have to pick your existing WiFi and enter your router’s password. Double check it. Enter the Wavlink extender login password carefully. If it keeps failing, switch to WPA2 instead of WPA3 on your router (extenders can be picky).
Signal Light Stays Red
That means it’s too far from your router. The extender isn’t magic. Put it halfway between your router and the dead zone, not all the way in the basement or garage. I had mine in a back room—moved it closer and boom, green light.
Keeps Dropping Connection
Update the firmware. Wavlink’s site has downloads, but heads up—it’s a pain. You’ll need to log in to the extender again (192.168.10.1), find the “Firmware Upgrade” tab, and upload the file. After that, it was way more stable.
Quick Reset Trick
If nothing works, reset and start fresh. Hold that reset button for 10–15 seconds, wait for the reboot, and redo the setup. Sounds obvious, but it solves most of the random glitches.
Comments