


Curved screens are becoming increasingly popular in home theaters, simulation rooms, and commercial installations due to their immersive viewing experience. Unlike flat screens, curved screens wrap around the viewer, providing a wider field of view and reducing distortion at the edges. However, setting up a projector for a curved screen requires careful calculation, especially when determining the correct throw distance. Proper placement ensures the projected image covers the entire screen evenly without blurring or distortion. In this blog, we will explore how far a projector should be for a curved screen, the factors that influence placement, and how tools like XTEN-AV simplify the process.
Understanding Projector Placement for Curved Screens
Throw distance is the distance between the projector lens and the screen. On flat screens, the throw distance is relatively straightforward, calculated using the projector’s throw ratio and the screen width. For curved screens, however, the geometry of the surface affects the placement. The projector must cover the entire curve evenly while maintaining focus across all areas.
The basic throw distance formula is:
Throw Distance = Throw Ratio × Image Width
For curved screens, the "image width" is considered the effective width that the projector must cover, accounting for the curvature. In practice, this means that the distance may need to be slightly increased or adjusted based on the curve radius to ensure uniform brightness and sharpness.
Factors Affecting Projector Distance for Curved Screens
Several key factors influence the ideal distance for projecting onto a curved screen:
1. Screen Size and Curvature
Curved screens are measured by their diagonal length and curvature radius. A deeper curve (smaller radius) requires the projector to be positioned further back to prevent distortion at the edges. Larger screens with gentle curves may require only minor adjustments compared to flat screen throw calculations.
2. Projector Throw Ratio
The projector’s throw ratio is the primary determinant of distance. Standard throw projectors require more space to project large images, while short throw projectors can achieve similar results from a closer distance. When projecting onto curved surfaces, ensure the throw ratio accommodates the effective screen width.
3. Lens Shift and Zoom
Projectors with lens shift and zoom capabilities are highly recommended for curved screens. Lens shift allows you to adjust the image vertically or horizontally without moving the projector, while zoom enables minor adjustments to fit the curve precisely. These features reduce keystone distortion and help align the image accurately.
4. Viewing Angle and Audience Position
Curved screens are designed to enhance the viewing experience by wrapping around the audience. Proper throw distance ensures that viewers sitting at different angles experience consistent brightness and focus. Incorrect placement can result in blurry edges or uneven image coverage.
5. Ambient Light Conditions
Ambient light affects image clarity and contrast, especially on curved surfaces where light may spread differently. Higher lumen projectors may be required to maintain brightness across the entire curve, and throw distance should account for maintaining adequate image intensity.
6. Ceiling Height and Mounting Options
Projector height and mounting options impact throw distance and alignment. Ceiling-mounted projectors are common in large curved screen setups, but low ceilings may necessitate table placement or specialized mounts. Proper calculations ensure the projector covers the full screen without obstruction.
Step-by-Step Guide to Calculating Throw Distance
- Measure the Curved Screen: Determine the diagonal size, width, height, and radius of curvature.
- Determine Effective Image Width: Account for the curve by measuring the horizontal span that the projector must cover.
- Check Projector Specifications: Obtain the throw ratio, zoom range, and lens shift capabilities.
- Calculate Throw Distance: Multiply the effective image width by the throw ratio. Adjust for curvature if necessary.
- Adjust for Vertical Alignment: Use lens shift or mount height to align the image with the curve.
- Test Viewing Angles: Ensure the image is clear and bright for all audience positions.
Using Tools for Accurate Calculation
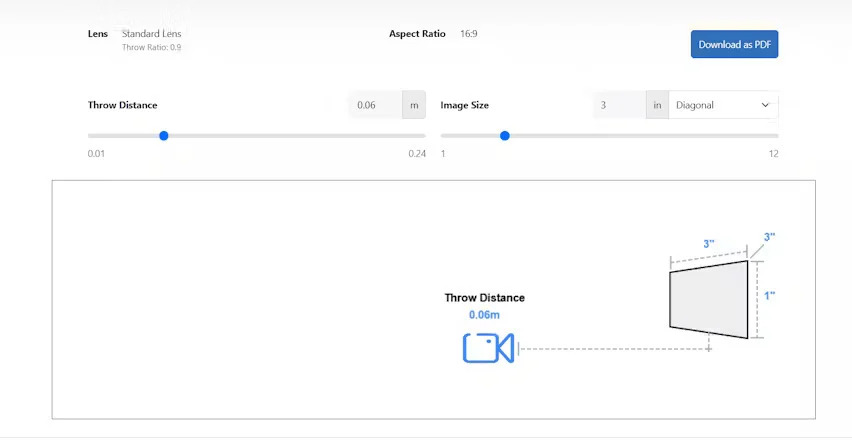
Professional AV tools like XTEN-AV simplify the calculation of projector distance for curved screens. By entering screen dimensions, curvature radius, projector model, and room layout, XTEN-AV can provide:
- Recommended throw distance for the chosen projector
- Minimum and maximum placement ranges for projectors with zoom lenses
- Visual simulations showing coverage across the curved surface
- Adjustment suggestions for lens shift, tilt, and keystone correction
These features save time, reduce errors, and ensure the projected image is properly aligned across the entire curve.
Practical Tips for Curved Screen Setup
- Choose a High-Resolution Projector: Large curved screens magnify image imperfections. Higher resolution ensures clarity across the curve.
- Minimize Keystone Correction: Use lens shift and zoom instead of keystone correction to maintain image quality.
- Test Placement Before Installation: Temporarily set up the projector to check focus, brightness, and alignment on the curve.
- Adjust for Ambient Light: Ensure projector brightness compensates for light distribution on the curved surface.
- Consider Multiple Projectors: For very large curved screens, edge blending multiple projectors may provide more even coverage and brightness.
Conclusion
Projecting onto a curved screen requires careful planning and accurate throw distance calculation to achieve a clear, evenly aligned, and immersive image. Factors such as screen size, curvature, throw ratio, lens shift, viewing angle, and ambient light all influence the ideal projector placement.
Using professional tools like XTEN-AV simplifies this process, offering precise throw distance calculations, visual simulations, and placement recommendations. By leveraging such tools, AV professionals and enthusiasts can ensure that curved screen installations deliver a high-quality, immersive viewing experience for all viewers.
Proper planning and accurate calculations guarantee that the projector fills the curved screen correctly, maintains image clarity, and provides an engaging and professional viewing experience, whether in a home theater, simulation room, or commercial environment.
Read more: https://techwaveav.alboompro.com/post/the-most-user-friendly-calculator-tools
Comments