


In 2025, projectors are widely used in classrooms, corporate offices, home theaters, and event venues. They deliver high definition visuals that can transform a presentation or viewing experience. However, even the best projector cannot perform optimally without correct placement. Calculating the throw distance manually helps ensure the projected image is the right size, in focus, and bright enough for the space.
While online tools and software simplify this process, understanding manual calculation is essential for professionals, enthusiasts, and anyone who wants to verify accuracy before installation. In this blog, we will explain what throw distance is, why it matters, and how to calculate it manually, highlighting why XTEN-AV emphasizes precision and planning in modern AV setups.
Understanding projector throw distance
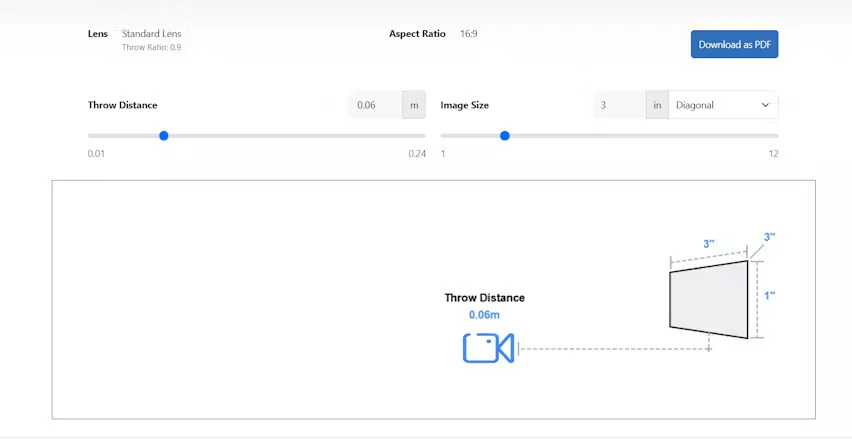
Throw distance is the space between the projector lens and the screen. It directly affects the size and clarity of the projected image. A projector’s throw distance is determined by its throw ratio, which is usually provided in the manufacturer’s specifications.
The formula for calculating throw distance is:
Throw Distance = Throw Ratio × Image Width
For example, a projector with a throw ratio of 1.5 placed 10 feet away from the screen will produce an image approximately 6.7 feet wide. Adjusting the distance changes the image size and can impact focus and brightness.
Projectors can generally be categorized into three types based on throw distance:
- Standard throw projectors: Typically installed several feet away from the screen and ideal for large rooms or auditoriums.
- Short throw projectors: Can produce large images from shorter distances, suitable for classrooms, small offices, or interactive displays.
- Ultra short throw projectors: Can project large images from just a few inches away, perfect for tight spaces or home theater setups.
Understanding throw distance helps ensure optimal image size and placement before installation.
Why throw distance calculation matters
Calculating throw distance manually is important for several reasons:
- Image clarity: Ensures the projected image is in focus across the entire screen.
- Correct image size: Prevents the image from being too small or too large for the screen.
- Brightness and uniformity: Proper distance ensures even illumination without dim spots or hotspots.
- Professional installation: AV integrators rely on precise measurements to plan room layouts, cable runs, and projector mounts.
- Home theater optimization: Accurate placement creates a cinematic experience with proper screen coverage.
Without accurate throw distance calculation, even a high quality projector may fail to deliver the desired viewing experience.
Steps to calculate projector throw distance manually
Manual calculation involves simple math and measurements. Here is a step by step guide to calculating throw distance for any projector.
Step 1: Find the projector’s throw ratio
Locate the throw ratio in the projector’s specification sheet or user manual. The throw ratio may be presented as a single value or a range if the projector has a zoom lens. For example, a throw ratio of 1.5 means the projector must be 1.5 times the image width away from the screen.
Step 2: Measure your screen width
Decide the desired width of the projected image or measure your existing screen. Throw distance depends on image width, so accurate measurement is critical. Use feet or meters consistently throughout your calculations.
Step 3: Apply the throw distance formula
Use the formula:
Throw Distance = Throw Ratio × Image Width
For example, if your projector has a throw ratio of 1.8 and you want an image 8 feet wide:
Throw Distance = 1.8 × 8 = 14.4 feet
This tells you where to position the projector for the desired image size.
Step 4: Consider zoom adjustments
If the projector has a zoom lens, the throw ratio may vary. Check the minimum and maximum throw ratios and calculate the throw distance for both extremes. This will give a range of possible placements and allow flexibility during installation.
Step 5: Account for lens shift
Many projectors offer vertical or horizontal lens shift, which allows you to adjust the image position without moving the projector. While lens shift does not change throw distance, it affects where the image falls on the screen. Make adjustments after calculating throw distance manually.
Step 6: Verify measurements
Before installation, double check all measurements. Use a tape measure or laser distance tool to ensure accuracy. Misplacement can result in images that are too small, misaligned, or improperly focused.
Step 7: Adjust for room layout
Consider obstacles, ceiling height, and seating arrangements. Manual calculation provides a baseline, but the projector’s placement may need minor adjustments to fit the room and maintain optimal image quality.
Tips for improving manual throw distance calculation
- Always use the correct units: Consistency in feet or meters prevents errors.
- Use the throw ratio range: For projectors with zoom lenses, calculate minimum and maximum distances.
- Measure screen width, not height: Throw distance is based on width for most calculations.
- Check focus after installation: Manual calculations provide placement, but final focus adjustments are essential.
- Combine with visual planning: Sketch the room layout and projector placement to avoid surprises during installation.
Advantages of manual calculation
While software and online calculators simplify the process, manual calculation has benefits:
- No dependence on software or internet: Useful in remote locations or when tools are unavailable.
- Full understanding of throw principles: Professionals and enthusiasts learn the relationship between throw ratio, image width, and distance.
- Flexibility: Manual calculation allows quick adjustments on site.
- Validation: Use manual calculation to verify results from online tools or software.
Why XTEN-AV emphasizes precision
While manual calculation is essential for understanding projector placement, modern AV professionals benefit from combining manual math with advanced tools. XTEN-AV offers software that complements manual calculation by providing real time visualization, projector databases, and cloud collaboration, ensuring precise placement and optimal image quality.
XTEN-AV solutions allow AV teams to cross check manual calculations, simulate room layouts, and adjust for lens shift and zoom, reducing installation errors and saving time.
Practical applications
Manual throw distance calculation is useful in many scenarios:
- Home theaters: Ensure proper screen coverage and cinematic quality.
- Classrooms: Standardize projector placement across multiple rooms.
- Corporate offices: Plan conference rooms and presentation spaces accurately.
- Event venues: Quickly determine projector placement for temporary setups or large screens.
By understanding the principles and calculating manually, installers gain confidence and accuracy before using software or online tools.
Final thoughts
Calculating projector throw distance manually is a fundamental skill for anyone working with projectors in 2025. It ensures the projected image is the right size, sharp, and evenly illuminated. Manual calculations also provide a deeper understanding of throw ratios, image width, and projector placement.
While online calculators and software solutions like XTEN-AV simplify the process and add advanced features, knowing how to calculate throw distance manually is invaluable. It allows professionals and enthusiasts to validate results, plan installations accurately, and achieve flawless image quality every time.
By combining manual calculation with modern tools, you can maximize projector performance and create the best viewing experience in classrooms, offices, home theaters, and event spaces.
Comments