


Insulation removal is a critical prerequisite to reinsulation that requires professional equipment, proper safety protocols, and thorough preparation. Most homeowners should budget $1-$3 per square foot for professional removal services, as DIY removal risks exposure to hazardous materials, incomplete extraction, and potential structural damage. The process typically takes 1-2 days for average homes and requires specialized vacuum systems, protective gear, and proper disposal methods.
The decision to remove existing insulation should be based on its condition, contamination level, and your reinsulation plans. Different insulation types—from fiberglass to cellulose to spray foam—each present unique removal challenges and health considerations that influence both technique and cost.
Why Insulation Removal Is Necessary
Removing old insulation before installing new material offers several significant benefits:
- Eliminates contaminated materials that may harbor mold, pests, or water damage
- Improves indoor air quality by removing allergens and irritants
- Provides access to inspect and repair structural elements, wiring, and plumbing
- Ensures maximum efficiency of new insulation without compression from old materials
- Removes fire hazards from degraded or improperly installed materials
Bonus Tip: Complete insulation removal offers an excellent opportunity to upgrade electrical systems and seal air leaks before installing new insulation, maximizing energy efficiency improvements.
Types of Insulation and Removal Considerations
Each insulation material presents unique challenges during removal. Understanding these
differences helps you prepare for the process and budget accordingly.

According to industry data, approximately 72% of homes built before 1990 have insulation that should be replaced rather than supplemented, primarily due to compression, contamination, or outdated materials.

Professional vs DIY Insulation Removal
While DIY removal may seem cost-effective, professional services offer significant advantages for most homeowners.

Bonus Tip: If choosing DIY removal, rent a commercial-grade insulation vacuum rather than using shop vacs, which quickly clog and spread dust throughout your home.
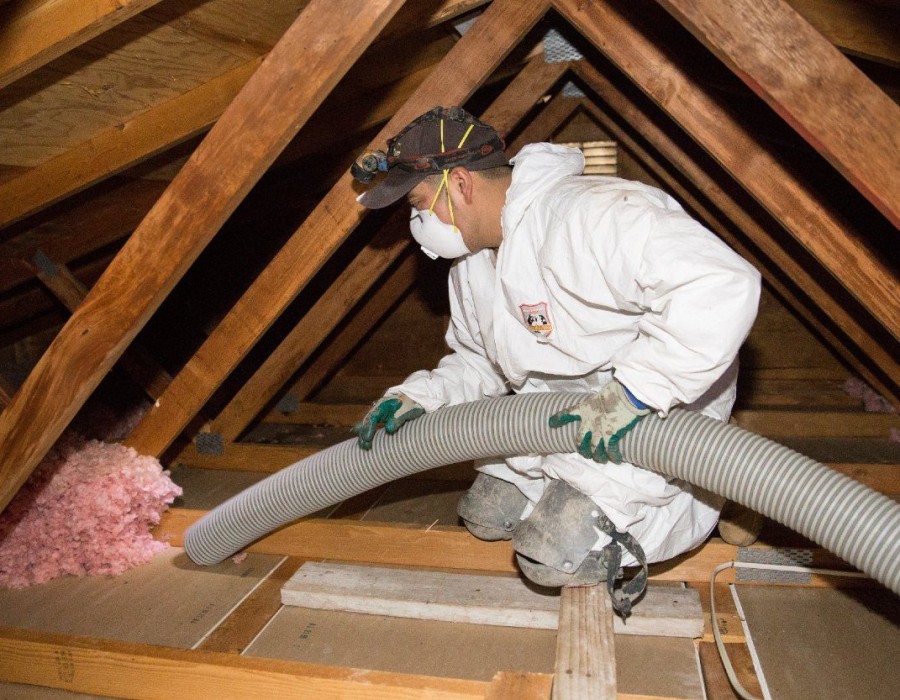
The Insulation Removal Process
Understanding the professional removal process helps homeowners prepare properly and know what to expect.
- Assessment and Planning
- Evaluation of insulation type and condition
- Identification of potential hazards (asbestos, mold, pests)
- Development of containment strategy
- Preparation and Containment
- Sealing of vents, doorways, and other openings
- Establishment of negative air pressure when needed
- Protection of fixtures and surfaces
- Removal Process
- Systematic removal using industrial vacuum systems
- Manual extraction of difficult areas and compressed material
- Continuous bagging and containment of removed material
- Cleaning and Inspection
- HEPA vacuuming of all surfaces
- Inspection for remaining material and structural issues
- Air quality testing when required
- Disposal
- Proper bagging and containment for transport
- Delivery to appropriate disposal facilities
- Documentation of proper disposal for hazardous materials
Technical Specifications for Insulation Removal Equipment
Understanding the technical aspects of removal equipment helps evaluate professional services or plan DIY projects.


Things to Consider Before Making a Decision
Before proceeding with insulation removal, evaluate these critical factors:
- Presence of hazardous materials: Test for asbestos, especially in homes built before 1990
- Extent of contamination: Determine whether localized or complete removal is necessary
- Building codes: Check local requirements for insulation R-values and fire barriers
- Timing: Schedule removal during moderate weather when possible
- Reinsulation plan: Coordinate removal and new installation to minimize exposure time
- Occupant health concerns: Consider temporary relocation during removal if family members have respiratory issues
Industry reports indicate that comprehensive insulation replacement typically yields 15-30% energy savings, with an average ROI period of 3-5 years depending on climate zone and utility rates.
Common Questions About Insulation Removal
When can insulation be left in place?
Undamaged, uncontaminated insulation that meets current R-value recommendations can sometimes remain in place. However, adding new insulation over old can compress existing materials, reducing their effectiveness and potentially creating moisture traps.
What signs indicate insulation needs removal?
Look for water staining, visible mold, pest droppings, compressed or flattened materials, drafty rooms despite insulation, and unusually high energy bills. Musty odors and increased allergy symptoms may also indicate problematic insulation.
How long should I vacate during removal?
For standard removal without hazardous materials, occupants can typically return the same day after completion. For asbestos removal or extensive mold remediation, 24-72 hours of vacancy is recommended to allow for air clearing and testing.
Insulation Removal FAQ
Can I remove the insulation myself?
While DIY removal is possible for small areas of non-hazardous materials, professional removal is strongly recommended due to health risks, specialized equipment requirements, and proper disposal regulations.
What happens if I leave wet insulation in place?
Wet insulation loses its thermal resistance properties, promotes mold growth, can damage structural elements, and may lead to pest infestations. Leaving wet insulation in place virtually guarantees more expensive repairs later.
How do I know if my insulation contains asbestos?
Vermiculite insulation, particularly the Zonolite brand used before 1990, commonly contains asbestos. Professional testing is the only reliable method to determine asbestos content. Never disturb suspected asbestos-containing materials without proper testing and abatement.
How soon can new insulation be installed after removal?
New insulation can typically be installed immediately after removal and inspection, provided any discovered structural, moisture, or pest issues have been addressed. Coordinating removal and installation services for consecutive days minimizes energy loss and inconvenience.
Make the Right Decision
Insulation removal represents a significant but necessary step toward creating a healthier, more energy-efficient home. While the upfront costs may seem substantial, removing compromised insulation prevents ongoing health hazards, structural damage, and energy waste.
Evaluate your specific insulation condition, consult with qualified professionals, and consider the long-term benefits of a complete removal and replacement strategy rather than adding new insulation over problematic existing materials.
Comments